Tuesday, April 04, 2006

Running Rigging Project Complete

One of the projects that I've been working on this winter has been the replacement of old running rigging and the update/upgrade of the associated deck hardware. This first photo shows the deck organizer with a couple of old lines left on for the winter. It is a 4 sheave organizer, which is fine unless you want to keep both reef lines in it and have two halyards, the pole lift, and the spinnaker tack line come through it.


In this photo you see the coachtop at the cockpit just aft of the above photo. You'll notice a distinct lack of clutching (and the old Easylock Midi that is there is at the end of its lifespan). Without a clutch on the jib halyard at left, it was impossible to secure it without leaving it on the winch. That tied up that winch permanently which meant that you couldn't use the other spare halyard rigged on this side of the boat. Also no clutching for the pole lift or any additional lines other than the two reef lines (one of which is coming through the Easylock. This set-up provided basic functionality (one headsail, reefs if needed) and worked fine for that. The issue was if you wanted to do anything more than basic.


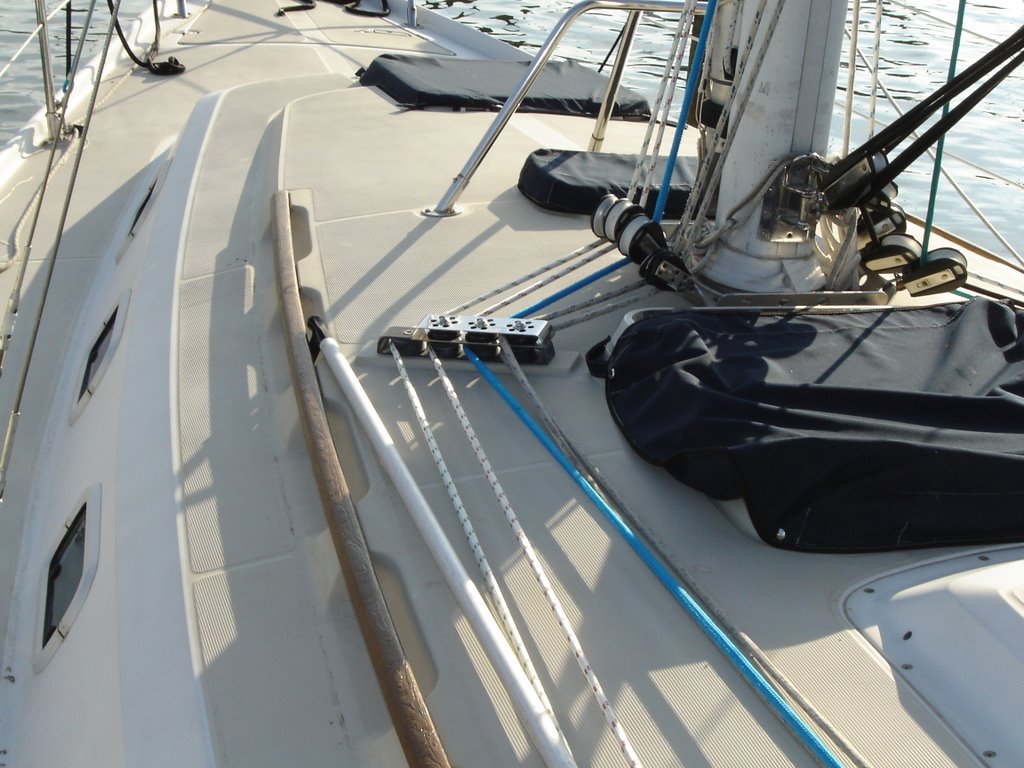
I searched for the original equipment Lewmar deck organizers to do the stack I had planned, but they no longer make them and I was unable to locate any at this time (they are 2" sheaves with 2.25" center to centers, if you have any you'd like to part with, please let me know!). Without the Lewmars available, I found that Schaefer had the size and spacing I needed for now. I put lines that don't get much use or load through the upper level (second reef, spin tack, etc...).


Then in the cockpit, I put in 3 new Spinlock rope clutches. The first one I added was an XCS (XTS would have worked fine, too) for the jib halyard and spinnaker/spare halyard- both lines replaced with 3/8ths Samson XLS-Extra. I replaced the Easylock double with 2 Spinlock XAS doubles to house the pole lift, spin tack, and both reef lines. I also replaced the main halyard and the traveler control lines during this process. I think all of this will make spinnaker work, double headsails, wing on wing, and reefing easier and safer. I'll let you know after we start using it more what changes, if any, I would have made.

First Voyage of 2006

We just couldn't resist the weather this weekend and took Sequoia out for her first voyage of the season. It felt really good after going through all the maintenance and upgrade stuff this winter to have it all do what was intended- GO SAILING! It was puffy (lots of gusts and shifts, some over 20 kts), so we just stuck the main up and still cruised around at 5.5 knots through the water. It just felt wonderful to be out on her again. Left is a wind observation chart from Sailflow, who has some great stuff if you haven't used it! Planning another cruise for Saturday--- We're racing on Sundays right now (on other boats), so Sequoia just sits quietly and watches.

Thursday, March 16, 2006

The work done right!


I try to keep this thing pretty positive... I haven't done my "I hate the marine industry" rant on here. But as we all know, the service one receives can often be terrible. I won't get into all the bad experiences here...
Well, we got a call from our current marina service manager the other day who had a couple of questions about the work that they had done on the exhaust riser (see a couple of posts ago). Turns out his guys had done the work with the materials they always use and just added the bronze part that I had ordered to that mix. Let me say here that they did a GREAT JOB! But, they used galvanized parts on the rest of the assembly--- Turns out that bronze parts are only another $50 and will last longer. The manager realized what had happened and offered to replace the galvanized with bronze for just the price of the parts- he'll cover the labor, since he feels like it was a mistake on their part. I am thrilled! I'm not so worried about the labor cost, just really impressed with the fact that he thought this was what we would have wanted in the first place, and decided to make it right. Have heart, boat owners-- good service is out there if you look!

Monday, March 13, 2006

Taking advantage of the weather...


I've been taking advantage of the first peek of summer in our area to work on the exterior of the boat. It's been in the 70's and 80's for the past few days. I started out with a good teak cleaning and brightening, then a light sand. I got everything taped and put on 3 coats of Cetol. We don't have much teak on the boat (thank God!), just the stern rail, the washboards, and the grab rails (pictured). I know a lot of people that just let the teak go grey, but I think on this type of boat a little bit of nice teak looks pretty sweet.
I did some of the metal polishing this weekend. There's still more to do, but I got the worst of it done- the rest can wait until cleaning day. We also started pulling the messenger lines and putting all the new running rigging on. It was a great feeling to pull off the wire to rope halyards and kiss them bye bye. The last of the rigging projects for this year is to put in the 2nd level of organizer on the port side. Lewmar doesn't make the same model anymore, so I'm going to have to stack Schaefer on top for now. I'll probably put Shaefer on the first level later- but time is up for major projects for this year!
We also had a rigger come out and start figuring out what needs done this coming fall-- looks like replacement of most or all of the standing rig, strip and paint the mast, and get new life lines. That's going to be some large boat units...
 Posted by Picasa

Tuesday, March 07, 2006

Sometimes Murphy is wrong...


You know the old Murphy's Law saying, right? "Anything that can go wrong, will go wrong." Well, as we all know, nowhere is that more true than older boats. After the great finish to the project the other day that found the corroded contacts, the starter turned over just fine. Whew. So when I went back yesterday to do some other work, I thought I'd fire up the diesel and let her run for a little bit--- but the fuel pump had quit working. I followed the wiring from the pump around and down and found a wire that had been spliced into the harness and had a broken terminal on the other end of it. After checking the wiring diagram and seeing that it should be a ground wire, I tested it on the block with the ignition on. Fuel pump went clicky clicky. Whew. So for $0.26 I got a new terminal from the chandlery at the marina and put it back on the block. The engine took a few minutes to start due to the cold, but she fired up just fine and ran like a dream.

Corrosion, how I despise thee...


Obviously this photo is just a fun pic showing of corrosion, and not what I found on the fuse fitting causing my starter trouble. I will say that I was pretty darned happy when we discovered that we simply needed to clean some corrosion off of a terminal to end the issue. It was a nice day, so I continued to work on another project... I replaced the old Easylock Midi rope clutch with a new Spinlock XAS double. Incredibly, the mounting holes were so close that I just had to drill each 1/16th" over (which I had to do anyway to get my machine screws to fit) and the new clutch dropped right into place. Miracles never cease! Only one more rope clutch left to mount in order to finish up my running rigging refit in the cockpit. I'm pretty pleased with how easy it has been so far.
Only a few more maintenance projects for this winter, then it will be time to do a good cleaning and get it ready to go!

Friday, March 03, 2006

Wiring Diagnosis...


Somewhere there is a place where electricity should be traveling--- and it's not. I've asked a friend who is really good with electrical systems and electronics to come and help diagnose and fix our problem. This all becomes greek to me very quickly and my patience runs thin trying to figure it out. We've had intermittent issues with trying to get the starter to turn over in the past and always thought it was a starter issue. I've been doing some diagnosis with the starter as well (again, upon the advice of people with more knowledge than me) and it seems to be fine for now. Although at a replacement cost of less than $200, it will be on the budget for later this year or early next. So we're getting out the multimeter and going to town tomorrow to see where we're losing continuity.
In the meantime, I've finished splicing the spin halyard... which leaves the spare and the topping lift yet to do. At $20 per 'eye splice' in the retail market, learning the splicing stuff has already saved me over $100 in the past week or so. And to think the set of fids cost $30... go figure.
There are also the last 2 winches to get broken down, cleaned and rebuilt...

Monday, February 27, 2006

Running Rigging...


I'm working on replacing all of the running rigging on the boat over the next year or so. I've already replaced the main halyard, and main sheet. Today I finished up splicing the lines for the traveler controls. I'm expecting the new line for my spinnaker halyard in the mail tomorrow, and I have the line for my new vang.
I decided to get myself a set of good splicing fids as a "gift to me" for X-mas, and I spent some time teaching myself to use them. Everyone I ever chat with about it says, "You know how to splice double-braid?" Yep, it's just really not that hard once you get the hang of it. I don't claim to be some rigging genius or anything, but putting an eye splice in double braid just isn't that hard. Download the directions from the rope manufacturer's website and get yourself a few scrap pieces of NEW line and go nuts! I saved myself about $75 this evening working on my lines. Add that to the money you can save buying end of reel pieces of line, and you're talking about saving about 60-70% of the cost of new running rigging. Seems like a worthwhile skill to learn, if you ask me... It's also a great project to work on when it's too damn cold to be working out in the cock-pit!

Saturday, February 25, 2006

New Riser...


The new riser elbow has been installed and looks great, as you can see. I'm hoping that the silicone bronze cast will outlast the iron, and that this is the last one I ever see go bad.
Work continues on the upgrades and re-organization of the running rigging on the coach top. New traveler control lines, new spin halyard, etc... Next big project there is going to be the mounting of 2 more new rope clutches.
Also on the short list is re-wiring the wiring harness from the cockpit control and guage panel down to the alternator. I've enlisted the help of an electrical engineer friend to see what improvements we can make here as well. More on that as it comes.

Wednesday, February 22, 2006

Exhaust Riser...


For our exhaust riser replacement (due to the failure shown in the picture), I contacted a diesel repair specialist in Annapolis, MD who suggested that the old iron one be replaced with a silicone bronze elbow that they had custom cast by the thousands. Seemed to me that it should have been that way from the start, but what do I know???
This was not a project that I was at all interested in tackling myself... So we had the yard do it. They did a fantastic job, it really looks great.
It's still cold, wet, and miserable... which means that I'm not doing any wiring work that requires me to be out in the cockpit- so my wiring diagnosis may have to wait until the sun comes out.

Tuesday, February 14, 2006

Snow...


Six inches of snow has put a damper on boat projects for a couple of days. But...
Only a few more weeks until spring commissioning!

Thursday, February 09, 2006

Zincs...


Sacrificial zincs are an important part of your boat in any place that sea (raw) water comes into contact with metal. This metal will corrode and breakdown before any of your other metal fittings. This keeps your other fittings in good shape. For instance, there's one on the prop shaft to keep the shaft and the prop from corroding in the sea water. I won't bore you with the chemistry involved-
I will say that none of the boat yards we've ever had the boat pulled at have replaced the zinc from the heat exchanger. That's the one in the picture. Make sure you confirm which will or will not be changed by the yard, and do the rest yourself!
Upcoming projects include wiring and exhaust riser replacement. Stay tuned...

Wednesday, February 01, 2006

Filter Day


Time to go through and replace fuel filters. I started with the pre-filter/water separator. It uses centrifugal (or is it centripetal? I can never remember the difference...) force to separate the water from the fuel, then runs the fuel through a 10 micron filter. So I replaced the filter element, then cleaned up the transparent water collection bowl. Then put it back on.
Next it was on to the actual fuel filter on the motor. This is a 2 micron filter to be sure you don't have anything nasty go through your cylinders. It's just a spin off, and prep and fill the new one and spin on. Then checked everything for leaks when I turned the fuel line back on and gave the pump a quick run.
Don't forget that the "Marine" label is just that- a label. There are only a couple of companies that actually build filter elements. Why pay double for the same product just because it says something about marine use? Just make sure you cross-reference your part numbers and double check the fits and gaskets!

Monday, January 30, 2006

New Rope Clutch


I've been working on a new organization plan for the running rigging on the coach top to make it more user friendly for double handed sailing. The boat didn't have a rope clutch for the jib halyard or the spinnaker halyard, so that was first on the list for this year. I found a great deal on a Spinlock XCS double. Drilling holes in the boat is a little nauseating, but it had to be done. If you're going to embark on this task in the future, make sure you call a buddy and have a beer for him. It's pretty much impossible to hold the machine screw and tighten the nut at the same time by yourself. Whole project only took about three hours (if you count the hour it's going to take me to put the headliner back to rights).

Battery Problem Solved!


The starting battery turned out to be bad... Nothing a small boat unit ($100) can't fix. The new one is a maintenance free battery- so no worries about maintenance with water and stuff. The newly built house bank and the starting battery both had a good charge on them today. Everything seems to be coming up voltage--- I mean roses!

Tuesday, January 24, 2006

More Maintenance---


Ahhhhh, battery... How I despise thee.

More fun maintenance work this week. Yet another three winches cleaned and rebuilt. Always exciting since there are four coach-top winches--- all different. There's a 21, a self tailing 21, a self tailing 17, and a 22. I guess I must have a thing for puzzles. But, this week finished the coach-top winches, just the cockpit winches to go.
I also did some battery work this week and discovered that none of the marinas have ever done battery maintenance during winterization and spring commissioning. Jerks. So I checked levels in the batteries (I know, I should do this more often... but I don't) and they were VERY low. Did I mention they were low. Well, let's just say they were low. So I topped them off. Then it was time to add a battery to the house bank. I took the starting battery out and linked it to the house battery (both same battery and age). Then I installed a dual-purpose that we have as a spare to be the starter. Everything is charging as I write this.

Thursday, January 12, 2006

Winch Cleaning Season!

Ahhh the joys of winch maintenance! Tear it all apart, then soak it in mineral spirits, then brush it all clean and rinse it, then try to figure out how it all goes back together. I will say that our winches were happy to get a good cleaning and lube job. It wasn't too bad of a job either. The Harken article on doing the job suggests cold beer- Good Suggestion! Also ordered a new double rope clutch today, but that's a story for another day.

One quick tip that I picked up somewhere (probably the Ericson web board) is to cut a hole the diameter of the winch base in the bottom of an appropriately sized cardboard box and put it over the winch while you're taking it apart. This will keep any errant parts from doing the "bounce-bounce-splash" trick and ending up at the bottom of your slip. And remember to use only light machine oil on pawls (not grease or they'll stick, and that will stink!) and a LIGHT coat of winch grease on the other moving parts. More pictures will follow as I continue the process of cleaning and lubing these- there are still a few left.
 Posted by Picasa

Monday, January 09, 2006

Holidays are over!

With the Holidays finally over, it's time to get back to work on the boat! This week is going to be winch maintenance week. Should be fun and exciting! Then we get to keep working at that list--
S

Saturday, December 17, 2005

The annual Holiday Party


The annual Sequoia Holiday Party was a smashing success! We had a total of 25 crew and friends of the boat. In lieu of gifts this year, we asked that our guests bring a donation for the local food bank or the local animal shelter... Our generous sailor friends brought several large bags and boxes of food and gift card donations for the food bank, and they also brought a great deal of food, treats and $120 in donations for the local annimal shelter. Way to go crew!
In good sailor fashion, we went through a couple of cases of beer, a couple of bottles of wine, and some booze - including drinking 1.5 bottles of Mount Gay Rum (http://www.mountgay.com). Again - Way to go crew!
Great fun was had by all, help was donated for our neighbors and animal friends who need a helping hand this season, and we're ready to start planning for the big Chesapeake Bay Ten Day Cruise 2006.
The photo is of the luminaria lighting the way for our guests to walk down the driveway...

Sequoia wishes you and yours a Safe and Happy Holiday Season!

Friday, December 16, 2005

Prepping for the Party...


We've been prepping for our annual holiday party for the boat's crew and friends for the past week. Yikes, next time- hire cleaning crew and get it catered. I'm sure lots of fun will be had by all.
Boat news: I'm teaching myself splicing... not a task for those without patience.

Friday, December 09, 2005

Decided to start the cruising Blog

I decided to start the new cruising blog. I think that all the maintainance and fun stuff we're doing to Sequoia will provide for better blogging. Besides, does anyone really care how much fun I have going racing?
Sequoia is a 1988 Ericson 38-200, hull #262. She's a fast boat with a comfortable interior.
We've left her in the water for the winter since most of the upkeep and upgrades this year are not hull related.

Posted by Picasa